Coding
Implementing the examples
This page describes coding fixtures in Java. Click the toggle buttons above to choose other options.
Overview
Concordion fixtures find commands in the instrumented specification and use them to verify the system under test.
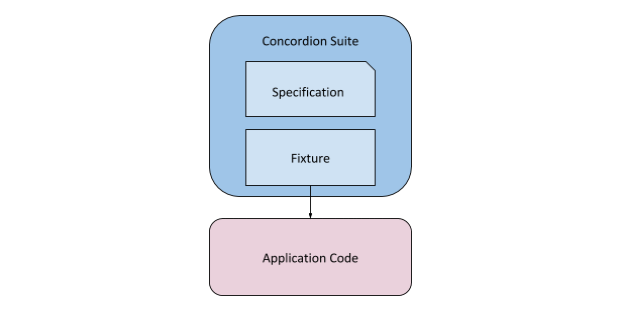
Concordion is a test runner that can invoke your application code directly:

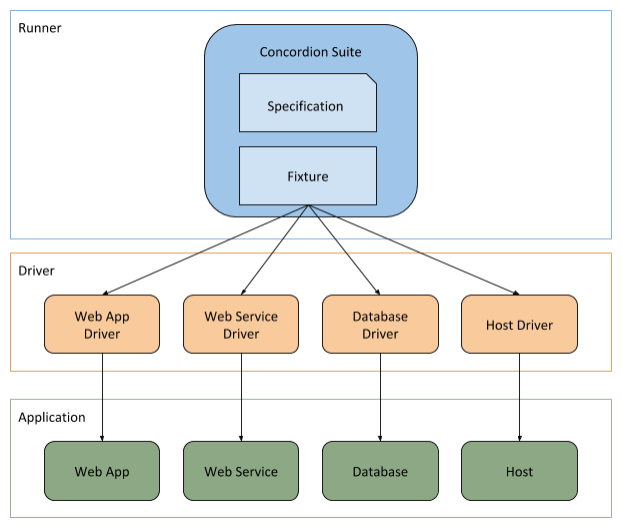
It can also drive the interfaces of your deployed application:

It is good practice to create a separate driver layer for the code that drives your application interface, keeping the fixture free of driver logic and the driver layer free of test assertions. Other libraries are required for the driver layer, such as Selenium WebDriver for web applications; wslite, JAX/WS or JAX/RS for web services; JDBC for databases, etc. Any Java library can be used with Concordion, providing a lot of flexibility in how you use it. See the FAQ for further detail.
Project Structure
Dependencies
Concordion 3.0.0 requires Java 8 or later and JUnit 4. Earlier versions require Java 6 or later and also support JUnit 3.
Concordion requires a number of libraries to be present, including Concordion, JUnit, XOM and OGNL libraries.
The best way to manage these dependencies is to use a build tool such as Gradle or Maven. See the download page for details of the dependencies section that must be added to the build.gradle or pom.xml file respectively.
As an alternative, you can download the full distribution from the download page. After extracting the files, you must add references to all the downloaded libraries to the project classpath.
Locating the Specification
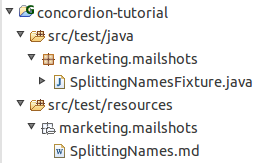
The fixture must be in the same package as the specification. It can be in a different source folder, as long as that folder is on the Java classpath. For instance the tutorial uses the conventional src/test/java folder for the fixture class, and the src/test/resources folder for the specification:

Some users prefer to have the specifications and fixture classes in the same folder, and adjust their build tool settings accordingly. Another common pattern is to create a distinct folder, such as src/spec, to keep the specifications and fixtures separate from unit tests.
Fixture classes
Concordion fixtures use the JUnit library, with a specialised ConcordionRunner.
Fixtures must be annotated with the @ConcordionFixture annotation (or @RunWith(ConcordionRunner.class) for JUnit 4 or JUnit Vintage.:
JUnit Jupiter
import org.concordion.api.ConcordionFixture;

@ConcordionFixture
public class SplittingNamesFixture {
}
JUnit 4 or JUnit Vintage
import org.concordion.integration.junit4.ConcordionRunner;
import org.junit.runner.RunWith;

@RunWith(ConcordionRunner.class)
public class SplittingNamesFixture {
}
A fixture class is required for each specification. The name of the fixture class and the specification share the same base name. The fixture has an optional suffix of “Fixture” or “Test” - for example, the fixture for the “SplittingNames.html” specification could be named “SplittingNames.java”, “SplittingNamesFixture.java” or “SplittingNamesTest.java”.
Unlike JUnit, we don’t annotate methods with @Test. Instead, the tests are determined from the specification. Each example in the specification that uses the example command is created as a separate JUnit test, and an additional [outer] test is added for any commands that exist outside of examples. If the example command is not used, the specification is run as a single JUnit test.
Fixture methods
Parameter types
Methods in Concordion fixtures can take the following parameter types:
- Numeric types (int, long, float, double, decimal)
- string
- bool
When executed from a Concordion specification, Concordion will automatically convert the value to the parameter type. Boolean values must be specified as true or false in the specification.
Return types
Methods can return void, a primitive or an Object.
Returning a Map result
As described in the tutorial, to check more than one result of a behaviour, you can return an Object from the execute command. An alternative is to return a Map object, for example:
public Map split(String fullName) {
    String[] words = fullName.split(" ");
    Map<String, String> results = new HashMap<String, String>();
    results.put("firstName", words[0]);
    results.put("lastName", words[1]);
    return results;
}
This is particularly useful when calling existing methods that return Map objects, or when using a JVM language with native language support for Maps, such as Groovy
Returning a MultiValueResult
The MultiValueResult class makes it even simpler to return more than one result from the execute command. For example, SplittingNamesTest can be simplified to:
package example;

import org.concordion.api.MultiValueResult;
import org.concordion.api.ConcordionFixture;

@ConcordionFixture
public class SplittingNamesFixture {

    public MultiValueResult split(String fullName) {
        String[] words = fullName.split(" ");
        return new MultiValueResult()
                .with("firstName", words[0])
                .with("lastName", words[1]);
    }
}
The specification can reference the properties of the MultiValueResult as if they were bean properties, as shown in the Splitting Names specification.
Implementation status
For specifications that don’t use the example command. you can include partially-implemented specifications in your normal build without breaking the build, by annotating your fixture classes with one of the following annotations:
@ExpectedToPass@ExpectedToFail@Unimplemented
For example:
import org.concordion.api.ExpectedToFail;
import org.concordion.api.ConcordionFixture;

@ConcordionFixture
@ExpectedToFail
public class GreetingTest {

   public String greetingFor(String firstName) {
        return "TODO";
   }
}
Further details: annotation specification.
If you are using the example command, you must set the implementation status on the individual examples in the specification.
Fail-fast
After an exception occurs, by default, Concordion continues processing the current specification so it can show all the problems not just the first one.
In cases where you want Concordion to stop processing the current specification after any exception occurs, add the @FailFast annotation to the fixture class.
The @FailFast annotation has an optional onExceptionType parameter that allows a list of specific exception types to be specified. In this case, Concordion will only stop processing if any of the specified exception types occur. For example:
import org.concordion.api.FailFast;
import org.concordion.api.ConcordionFixture;

@ConcordionFixture
@FailFast(onExceptionType={DatabaseUnavailableException.class, IOException.class})
public class MyDataTest {

   public void connectToDatabase() {
        ....
   }
}
Further details: Fail-Fast specification and Fail-Fast on specific exceptions specification.
If using the run command, adding the @FailFast annotation to the corresponding fixture will cause the specification to fail-fast if any of the specifications it runs fail-fast. For this to work, the @FailFast annotation is required on the fixture classes for both the calling and called specifications.
Field Scope
Concordion encourages you to keep your examples completely independent of each other. This allows individual examples to be run in isolation. It also makes the specification easier to follow when you can read examples in isolation.
To support this behaviour, Concordion reinitialises the fields in fixture objects for each Concordion example (where the example is using the example command). This is standard JUnit behaviour (in fact, JUnit creates a new fixture object for each test).
However, we recognise that sometimes you will want to share fields across a specification when the field is expensive to initialise, for example a browser instance or database connection. Concordion provides support for specification scoped instance fields, in addition to the default example scope.
For example:
@ConcordionScoped(Scope.SPECIFICATION)
private ScopedObjectHolder<AtomicInteger> specScopedCounter = new ScopedObjectHolder<AtomicInteger>() {
    @Override
    protected AtomicInteger create() {
        return new AtomicInteger();
    }
};
Note: fields for extensions that are annotated with @Extension default to specification rather than example scope.
See the ConcordionScoped specification for details.
The concordion-scope-examples project demonstrates the possible combinations of scope (suite, specification, example) and runner (serial, parallel) using a web test suite where the browser is created per example, per specification or once for the whole suite.
Before and After hooks
The before and after hooks mark fixture methods to be invoked before or after an example, specification or suite:
| Before | After | |
|---|---|---|
| Example | @BeforeExample |
@AfterExample |
| Specification | @BeforeSpecification |
@AfterSpecification |
| Suite | @BeforeSuite |
@AfterSuite |
Note:
- the example hooks require you to use the example command.
-
the suite hooks must be in the fixture that is being run directly by JUnit. Suite hooks on “child specifications” that are being run using the run command will be ignored.
For example, assuming we have the following suite:
     Product
         Theme 1
              Feature 1
                  Sub-Feature 1
                  Sub-Feature 2
              Feature 2
where the specification at each level contains a run command that runs its child specifications. When the
Productfixture is run, its suite hooks will be invoked. The suite hooks on the child specifications that are invoked by the run command will be ignored.A common pattern is to have a base fixture class that contains common suite hooks and is extended by all fixtures. This allows a fixture at any level of the suite (eg.
Product,Theme,Feature,Sub-Feature) to be run with the common suite hooks invoked at the start and end of the suite.
See the Concordion scope examples project for example usage of before and after hooks.
Configuration Options
The @ConcordionOptions annotation allows you to:
- configure extensions to the Markdown syntax,
- add namespace declarations to Markdown specifications, and
- output the source HTML that are generated for alternate specification types, which is useful for debug purposes.
Adding resources
The @ConcordionResources annotation can be used to add new CSS, JavaScript, images, or other resources to your specification in order to tweak or completely overhaul the existing styling.
This annotation:
- can be applied to all classes in the fixture’s class hierarchy - specify the resources once and have them applied everywhere, or limit the changes to a single fixture
- includes wildcard support
- can be configured to either embed or link JavaScript and CSS files in the output specification
- can be configured to exclude Concordion’s default styling from the output specification
As an example, executing the following fixture:
package resources.test;

import org.concordion.api.ConcordionResources;
import org.concordion.api.ConcordionFixture;

@ConcordionFixture
@ConcordionResources( value = { "resources.*", "/resource?.c??" } )
public class ConcordionResourcesDemoTest {
}
adds the following resources to the generated specification:
- resources.js
- resources.txt
- ../../resources.css
See the ConcordionResources specification for other examples.
Full OGNL
Concordion deliberately restricts the expression language for instrumenting specifications.
This can be overridden by annotating the fixture with @FullOGNL to allow complex expresssions.
Adding Extensions
Extensions are added to Concordion fixtures by:
- Adding the
@org.concordion.api.extension.Extensionsannotation to the fixture class. This annotation is parameterised with a list of extension, and/or extension factory, classes to be installed.
For example:
@ConcordionFixture
@Extensions({LoggingTooltipExtension.class, TimestampFormatterExtension.class})
public class MyTest {
...
- Or adding the
@org.concordion.api.extension.Extensionannotation to fields in the fixture class. This allows the extensions to be configured per class instance. For example:
...
@Extension
ConcordionExtension extension = new ScreenshotExtension().setScreenshotTaker(camera);
...
- Or by setting the system property
concordion.extensionsto a comma separated list of extension, and/or extension factory, classes. For example:
java -Dconcordion.extensions="org.concordion.ext.LoggingTooltipExtension,com.acme.Extra"
For further details see the extension configuration specification.
System Properties
Concordion output location
The Concordion output location can be set using the system property concordion.output.dir. If not set, Concordion defaults to the value of the java.io.tmpdir system property.
See Gradle or Maven for examples of how to apply this using your build tool.
Creating an extension
The Extensions API allows you to add functionality to Concordion, for example implementing new commands, listening to events, or modifying the Concordion output.
For full details, see the extension specifications and the extensions API. Refer also to the source code for the published extensions.
Extensions must implement the ConcordionExtension interface, which allows extensions to hook into the Concordion build phase through the ConcordionExtender interface.
Example: Adding a style to “set” commands
As a simple example, the input style extension adds styling to set commands. To do this, it listens to set commands and adds some CSS:
public class InputStyleExtension implements ConcordionExtension {

  private static final String INPUTSTYLE_CSS_SOURCE_PATH = "/org/concordion/ext/inputstyle/inputstyle.css";
  private static final Resource INPUTSTYLE_CSS_TARGET_RESOURCE = new Resource("/inputstyle.css");

  @Override
  public void addTo(ConcordionExtender extender) {
    InputStyleOutputter outputter = new InputStyleOutputter();
    extender
      .withSetListener(outputter)
      .withLinkedCSS(INPUTSTYLE_CSS_SOURCE_PATH, INPUTSTYLE_CSS_TARGET_RESOURCE);
  }
}
where InputStyleOutputter is:
public class InputStyleOutputter implements SetListener {

    @Override
    public void setCompleted(SetEvent event) {
        event.getElement()
            .addStyleClass("inputvalue");
    }
}
If you’d prefer to embed the CSS in the HTML, rather than link it, use concordionExtender.withEmbeddedCSS(). Similar methods exist for including JavaScript in the output, or you can use withResource() to copy images or other resources to the output. (Note: These methods are useful when writing extensions that also perform additional functionality. If all you want to do is add CSS, JS or resources, see the adding resources section above.)
For other examples, see the source code of the extensions listed on the extensions page.
