Getting Started
The basics of creating living documents using Concordion
This page explains getting started with HTML specifications in C#. Click the toggle buttons above to choose other options.
Creating a living document is a 4 step process:
- Discussing
- Documenting
- Instrumenting
- Coding
Depending on your skillset and role you might be involved in one or more of these steps.
To follow along the tutorial, we’ve created a project you can download, or clone using Git:
git clone https://github.com/concordion/concordion-tutorial-csharp-html
Under the Marketing.Mailshot folder, this project contains folders for each stage of the tutorial. You can either start from scratch with the Initial folder of the project, jump some steps to the Documented or Instrumented folders, or go straight to the Completed folder to see the final solution.
1. Discussing
By collaboratively exploring requirements with realistic examples, teams build a shared understanding and detect issues and misunderstandings prior to developing a new feature.
For this tutorial, we are working on a system for creating marketing mailshots. We want to have the first name and last name of the customer. Unfortunately the customer data that we are supplied only contains full names, so we will need to split them.
We start off discussing a simple example:
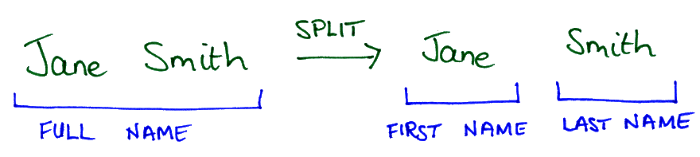
When discussing examples, we need to consider the context (preconditions), actions and outcomes for each example. In this example, the context is the name Jane Smith, the action is split and the outcomes are the first name Jane and last name Smith.
As we progress, we discuss more complex cases. We often find it convenient to use tables, timelines or other diagrams to quickly and concisely describe examples:
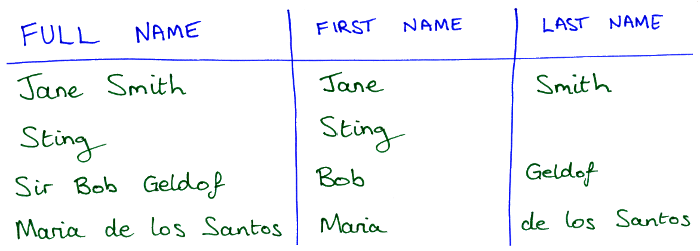
Find out more about discussing examples.
2. Documenting
The next step is to create a specification of the new feature.
If starting the tutorial from this stage, start with the Initial folder of the tutorial project.
In the tutorial project, edit the file SplittingNames.html to contain the following.
<html>
<head>
    <link href="../concordion.css" rel="stylesheet" type="text/css" />
</head>

<body>

   <h1>Splitting Names</h1>

   <p>To help personalise our mailshots we want to have the first name and last name
      of the customer.
      Unfortunately the customer data that we are supplied only contains full names.</p>

   <p>The system therefore attempts to break a supplied full name into its constituents by
      splitting around whitespace.</p>

   <h3>Example</h3>

   <p>The full name Jane Smith will be broken into first name Jane and last name Smith.</p>
</body>
</html>
This uses HTML, which is the markup language that web pages are written in. It enables you to create rich documents using plain text. Typically, you only need a small subset of HTML for Concordion specifications. In the HTML above:
- The
<link>element in the header tells the browser to use theconcordion.cssstylesheet. <h1>and<h3>are headings at level 1 and 3 respectively.<p>is a paragraph.
Opening this specification in a browser or an editor that supports HTML preview, we see it looks like: 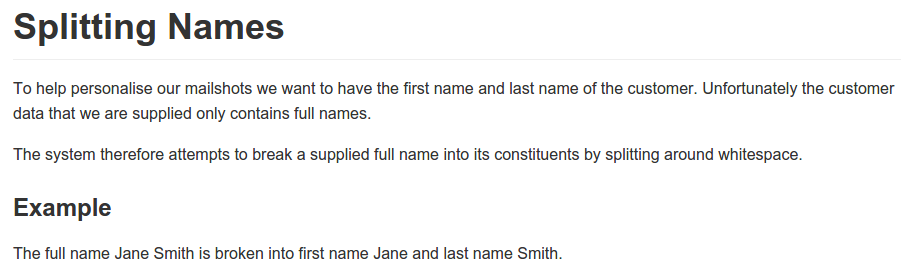
The tutorial project includes a concordion.css file containing the default Concordion styling, so that the preview looks similar to the actual Concordion output.
The team are happy with the specification, so we share it (for example, by adding the file to our version control system).
Find out more about documenting specifications.
3. Instrumenting
If starting the tutorial from this stage, start with the Documented folder of the tutorial project.
In order to make the specification executable, it must be instrumented with commands. The instrumentation is invisible to a browser, but is processed by the fixture code.

The first step is to select the words in the example that define the context (preconditions), actions and outcomes. In our example, the context is the name Jane Smith, the action is broken and the outcomes are the first name Jane and last name Smith. We select these parts of the example and create <span> tags around them (we can actually use any HTML tag):
The full name <span>Jane Smith</span> will be <span>broken</span>
into first name <span>Jane</span> and last name <span>Smith</span>.
Concordion commands use a “concordion” namespace. Change the opening <html> tag of your specification to add this namespace:
<html xmlns:concordion="http://www.concordion.org/2007/concordion">
To use Unicode (in case of accents for example), specify the content type after the html tag as follows:
    <head>
        <meta http-equiv="Content-Type" content="text/html; charset=UTF-8" />
    </head>
Next, we add Concordion commands as attributes on elements in the XHTML document. Web browsers ignore attributes that they don’t understand, so these commands are effectively invisible.
The full name <span concordion:set="#name">Jane Smith</span>
will be <span concordion:execute="#result = Split(#name)">broken</span>
into first name <span concordion:assert-equals="#result.firstName">Jane</span>
and last name <span concordion:assert-equals="#result.lastName">Smith</span>.
These commands are:
- setting our context, by setting a new variable
#nameto the valueJane Smith - executing our action, by executing the method
Split()with the variable#nameand returning the value#result - verifying our outcomes, by checking whether
#result.firstNameis set toJane, and#result.lastNameis set toSmith.
We also wrap the example in a <div> element with the class set to example, so that it is styled as a distinct example:
<div class="example">

    <h3>Example</h3>

    <p>
        The full name <span concordion:set="#name">Jane Smith</span>
        will be <span concordion:execute="#result = Split(#name)">broken</span>
        into first name <span concordion:assert-equals="#result.firstName">Jane</span>
        and last name <span concordion:assert-equals="#result.lastName">Smith</span>.
    </p>

</div>
Find out more about instrumenting specifications.
4. Coding
If starting the tutorial from this stage, start with the Instrumented folder of the tutorial project.
Finally we create some code, called a fixture, that links the instrumented specification with the system under test.
In the tutorial project, the file SplittingNamesFixture.cs already contains the following:
using Concordion.NET.Integration;

namespace Marketing.Mailshot.Instrumented
{
    [ConcordionTest]
    public class SplittingNamesFixture
    {
    }
}
(where the last part of the namespace depends on which subfolder of the tutorial project you are using).
The tutorial project is already configured with the Concordion dependencies needed to run this fixture as a test. It also has a ‘Concordion.Tutorial’ solution file you can open with Visual Studio.
To be able to run the Concordion.NET tests with NUnit you need to copy Concordion.NUnit.dll from the lib\Concordion folder of the tutorial project to your installation of NUnit (eg. <nunit-2.6.4-installation-path>\bin\addins\). See Test runners for further details.
If you run the fixture as a NUnit test, the console will show the test results, such as:
------ Test started: Assembly: Marketing.Mailshot.dll ------

Test 'Executable Specification: SplittingNamesFixture' failed: NUnit.Core.NUnitException : Exception in Concordion test: please see Concordion test reports

TestFixture failed: NUnit.Core.NUnitException : Exception in Concordion test: please see Concordion test reports

0 passed, 1 failed, 0 skipped, took 0.78 seconds (NUnit 2.6.4).
The Concordion output is written to your temp folder, for example to
%TEMP%\Marketing\Mailshot\Initial\SplittingNames.html
, dependent on the folder that you are running the test from. By default, %TEMP% is set to your %USERPROFILE%\AppData\Local\Temp folder, for example C:\Users\<your-windows-user>\AppData\Local\Temp.
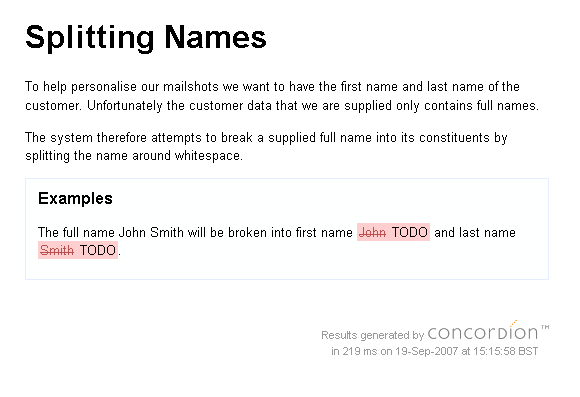
Opening this URL in a browser, the output should look something like this:
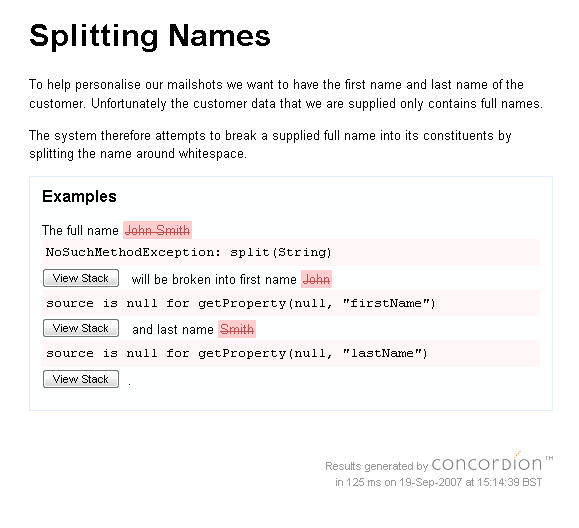
The test of the example is failing since we haven’t implemented the Split() method. We’ll flesh out our fixture code:
...
    [ConcordionTest]
    public class SplittingNamesFixture
    {
        public Result Split(string fullName)
        {
            return new Result();
        }
    }

    public class Result
    {
        public string firstName = "TODO";
        public string lastName = "TODO";
    }
}
Run it now and you get:
Let’s implement the function. Obviously the implementation should be in the real system not in the test case, but just for fun…
...
    [ConcordionTest]
    public class SplittingNamesFixture
    {
        public Result Split(string fullName)
        {
            Result result = new Result();
            string[] words = fullName.Split(' ');
            result.firstName = words[0];
            result.lastName = words[1];
            return result;
        }
    }

    public class Result
    {
        public string firstName;
        public string lastName;
    }
}
The test now passes:
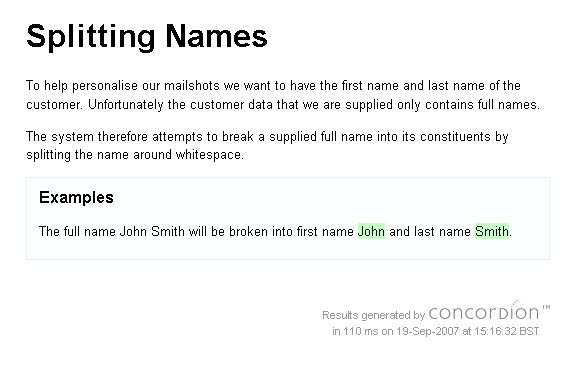
Find out more about coding fixtures.
This is the end of the basic tutorial. Feel free to move straight onto Next Steps, or follow the advanced tutorial below.
Advanced Tutorial
- Now you understand the basics, alter your specification to use a table to show several examples of behaviour.
-
To check a single example that returns a collection of results, you’ll need to use the
verify-rowscommand. Create aPartialMatches.htmlspecification and add the example verify-rows command. Implement agetSearchResultsFor(string searchString)method in thePartialMatchesFixture.csfixture class to make this specification pass -
We can build test suites by running a specification from another specification. In the
marketing.mailshotspackage, create a new specification calledMailshots.htmlwith the following contents:<html xmlns:concordion="http://www.concordion.org/2007/concordion"> <body> <h1>Mailshots</h1> <p>Mailshots are produced on-demand.</p> <p>To help personalise the mailshots we <a concordion:run="concordion.net" href="SplittingNames.html">split names</a> into constituent parts.</p> </body> </html>In the
marketing.mailshotspackage, create an empty fixture class, called MailshotsFixture.cs:using Concordion.NET.Integration; namespace Marketing.Mailshot.Comple { [ConcordionTest] public class MailshotsFixture { } }Running this fixture will run the linked
SplittingNamesfixture.Using links, we can create a test suite, with breadcrumbs making it easier to navigate the results.
You’ve now seen all of the Concordion commands you’re likely to need on a day-to-day basis. Feel free to browse through the rest of this documentation, learn good practices in the Hints and Tips section, try out our Integrations or Extensions, browse the FAQ or try the Cubano framework which integrates Concordion with a number of Concordion extensions, Selenium WebDriver and other open-source projects to provide a ready-made framework for web and API testing.